


In an attempt to making work on the weekend fun, we had a horse themed party this weekend celebrating the beginning of Track Season at the nearby Saratoga Gaming & Raceway. I made a cake shaped like a horse, of course. If you ever want to make a cake for a horse lover or a theme party, here's the basic step by step of what I did.
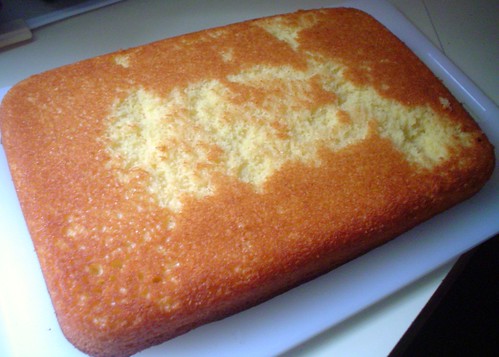
I used a yellow cake mix (shhhhh) and a 13x9 pan. After the cake is cooled completely, remove it from the pan and put it onto a cutting board.
I cut the neck/chin outline first. It's a little triangular shaped piece, and I cut it left of center at the bottom of the cake. The top left corner I cut at an angle, starting at about the center of the left hand side and rounded a little to the right, ending about two inches from the top left corner. The back of the horses neck is cut from about the center of the top at a downward slope to about a third of the way down the top right side. Excuse the bad blurry pictures - good natural light was unavailable.
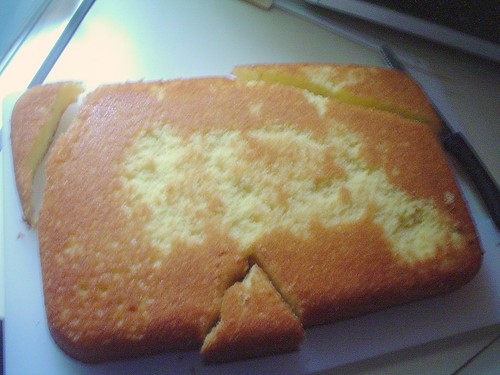 Bad blurry picture
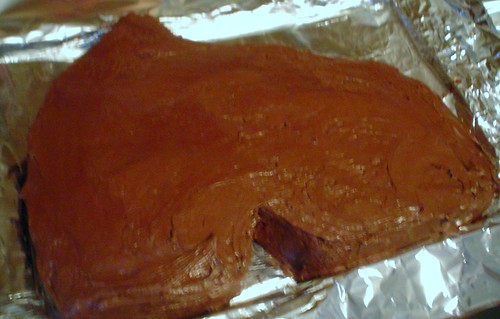
After carving the cake, remove the triangular neck piece and move it to the top for an ear. I used chocolate frosting for a brown horse, but any flavor or color will work.
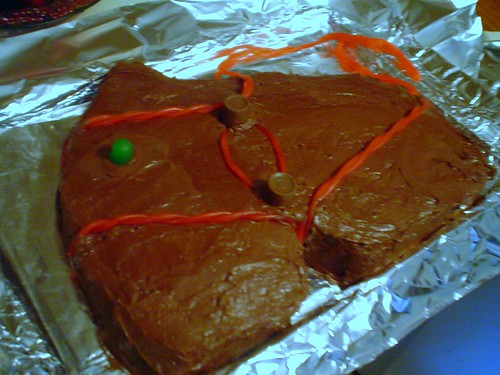
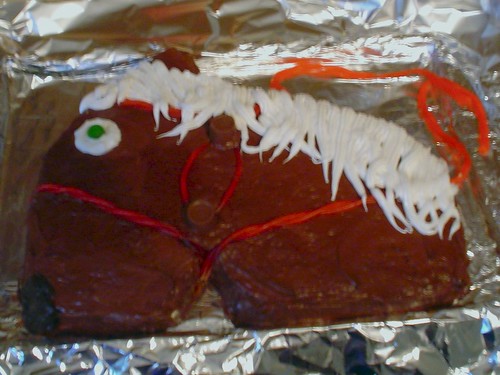
After having your base horse color frosting down, it's time to add the facial features, bridle, and the reins. Black licorice can be used, however I used Twizzler's Pull and Peal licorice because they are longer and more flexible, but mostly because they don't taste like black licorice. I used Rolos for part of the bridle as well, but Life Savers could also be used. I made the eye with a blob of fluffy white whipped frosting and a green Dots candy left over from our snacks at the drive-ins.
The mane is done last, because it overlaps the bridle and reins. I used white whipped frosting and tip #21 (the star tip). Start at the top of the head squeezing the icing bag lifting upwards. I released pressure and pulled the bag away to get the tapered look. It's relatively easy to do, but I recommend a few practice strokes on a cutting board. I colored the chocolate frosting with brown icing dye to make it a little darker for his nose.
With enough ambition, the spare corner pieces can be frosted with orange frosting for carrots, used to turn the horse into a unicorn, or they can be eaten to make sure the cake is suitable for serving to others.
Here are a few other cakes I've made before.
I used a yellow cake mix (shhhhh) and a 13x9 pan. After the cake is cooled completely, remove it from the pan and put it onto a cutting board.
I cut the neck/chin outline first. It's a little triangular shaped piece, and I cut it left of center at the bottom of the cake. The top left corner I cut at an angle, starting at about the center of the left hand side and rounded a little to the right, ending about two inches from the top left corner. The back of the horses neck is cut from about the center of the top at a downward slope to about a third of the way down the top right side. Excuse the bad blurry pictures - good natural light was unavailable.
Bad blurry pictureAfter carving the cake, remove the triangular neck piece and move it to the top for an ear. I used chocolate frosting for a brown horse, but any flavor or color will work.
After having your base horse color frosting down, it's time to add the facial features, bridle, and the reins. Black licorice can be used, however I used Twizzler's Pull and Peal licorice because they are longer and more flexible, but mostly because they don't taste like black licorice. I used Rolos for part of the bridle as well, but Life Savers could also be used. I made the eye with a blob of fluffy white whipped frosting and a green Dots candy left over from our snacks at the drive-ins.
The mane is done last, because it overlaps the bridle and reins. I used white whipped frosting and tip #21 (the star tip). Start at the top of the head squeezing the icing bag lifting upwards. I released pressure and pulled the bag away to get the tapered look. It's relatively easy to do, but I recommend a few practice strokes on a cutting board. I colored the chocolate frosting with brown icing dye to make it a little darker for his nose.
With enough ambition, the spare corner pieces can be frosted with orange frosting for carrots, used to turn the horse into a unicorn, or they can be eaten to make sure the cake is suitable for serving to others.
Here are a few other cakes I've made before.


6 comments:
How CUTE!
You are multi-talented!
I love your horse! Did you invent the pattern yourself?
And have you created any jewelry for the well-heeled horsey set?
Thanks!
*******
No, I wanted to carve a horse head into a cake, but looked online for a pattern figuring there had to be one out there, liked this one the best.
I used this website for the cutting dimensions:
http://jas.familyfun.go.com/recipefinder/display?id=50134
I was going to use coconut for a mane, but I know some people don't like coconut as much as your daughter and I. I tried tip #3 which is round too, but I liked the look of the star tip better.
The website suggests carrots but I thought the scraps would make a nice unicorn.
Great cake! I took a peek at your other cakes. Fantastic!
that is very cute ...I will have to have you make my next birthday cake...how is your hair by the way??? It is Charlene btw
Hair's good, but still never looks the same as when you do it :)
Post a Comment